About a year ago, I embarked on a brand new project to make a removable armchair cover for an armchair that we bought a number of years ago, when OH's dad came to visit one Christmas. It was bought inexpensively last minute, and he didn't actually find it comfortable to sit in, but we did and have enjoyed it ever since.
The trouble was, it wasn't very attractive, it was a bit dirty and worse for wear and it didn't really fit in with our decor. I'd tried stretch covers, but they didn't fit well and were a synthetic type of fabric that I didn't really like.
As a consequence, we considered getting rid of it when we bought a new armchair and footstool for the living room, but in the end we decided to keep it, as it is a very comfortable chair to sit in and we could imagine it as a lovely reading chair. I then decided that I would try to piece together a removable cover for it.
Here's the chair in question:

To make the cover, I basically draped the chair with fabric and cut the fabric around it's different features, i.e. the wings, the back, the arms and the seat. It took quite a while to do and was quite tricky, but once the pieces were pinned together it began to take shape.
Here's a photo at the end of the pinning stage:
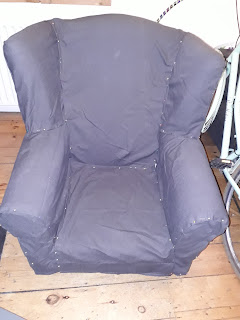
The fabric I used was from a large pair of dark grey linen IKEA curtains, which I think I might have bought at a charity shop, but I can't actually remember. I managed to incorporate the curtain tape around the bottom of the chair to create a finished edge, which saved a bit of sewing and (to be honest) because I was too lazy to unpick it all.
Once pinned together, I proceeded to tack and then machine sew the pieces together on my machine and then try it back on the chair. It's not a perfectly tight fit, but then loose covers shouldn't be, but I'm happy enough with it, especially considering it's my very first attempt at making these.
Having machine stitched it together, it was left in situ on the chair for probably six months or more, until this last week when I took it off and continued work on it. I finished tacking and then machine stitching the velcro into place at the front and back, so that it could easily be put on and pulled off the chair when it needs a wash and this concluded the main body of the project.
All I then needed to do was to make a cover for the seat cushion. Looking at the original, it had a zip along the back edge, so I tried to make the cushion cover in the same way. I needed to use the second of the two IKEA curtains for this purpose, but I didn't use a whole lot of it thankfully, as I want to use the remainder for a new patchwork project.
I didn't expect the cushion cover to take too long to make, but sometimes it's the things that seem most straightforward that take longer. Eventually, after much pinning/tacking/untacking/pinning/tacking and then finally machine stitching, I managed to get it done. Fortunately, I had a long grey zip in my stash that I could use as the fastening. I didn't pipe the edges, like the original, and it's not perfect, but it looked okay regardless. It was just great to finally finish this project after such a long time.
Here's a picture of the finished result:


There are strips of velcro down the entire back of the cover at each side which make it very easy to take off and put on again, and also shorter strips of velcro on the bottom part at the front.
I'm super happy with it. It means we could save the chair from landfill and still enjoy using it and it probably saved us hundreds of pounds, which is how much it would have cost to get a cover made by someone else, as they can be very expensive. It was a different sewing challenge for me, but one that brought a lot of satisfaction. It challenged me, but I met the challenge head on and succeeded and that's a great feeling.
I'm now looking forward to actually enjoying the pleasure of just sitting in it again and simply reading a good book. Bliss.
I remember my mum making loose covers in the same way, but she never owned a sewing machine, your chair looks good.
ReplyDeleteThanks Marlene, it's amazing that your mum did this without a sewing machine.
DeleteYou did an awesome job. I love it!!!
ReplyDeleteGod bless.
I think it's astoundingly good!!!! I can't imagine even doing this without a pattern and making it fit so well! And the eco aspect of this makes me love it even more!
ReplyDeleteWow, great job! It looks really good, comfy, thrifty, eco friendly, what more can you ask for ?
ReplyDelete